Showing posts with label decor. Show all posts

Monday, April 21, 2014

DIY Curtain Rods


So we recently just moved from Alabama back to our home state of Arkansas -- YAY! :) We're living on the base and I'm just so in love with our house, which was built sometime in the 70's. At our last base our windows were of "normal" size, the windows at our new house are bigger. Which I absolutely love because I love letting in as much natural light as I can, just brightens the place up.

However, since I've never shopped for large windows I did not realize how expensive curtain rods were. Ridiculous. Price varies depending on where you are shopping, but we saw anywhere from $40-$60. We are only wanting curtains on 3 windows, so we were looking at $120-$180. Sorry, but we just couldn't imagine paying that much. SO, we went the DIY route.

Super easy and a lot cheaper. Here's what we got (for three windows):
3- Madison Mill 1-3/8-in x 8-ft Round Poplar Dowel
6 - Garment Hooks
6 - Cabinet Knobs of your choice - Our son chose the red knobs for his room, the almond knobs we did for the dining room and our bedroom.
1 package of Hanger Bolts
Spray Paint of your choice - Optional. We chose to spray paint our dowels. Our son picked out red, though he decided he wants to wait to paint it. ;)

We had our dowels cut to the size we needed for our windows, 84". Spray painted them and let them dry overnight. The hubs used the drill to put the hanger bolts in, you'll need these to screw the knobs on. Hang garment hook of  your choice above window, put your curtains on your dowel and hang. That's it! It's that easy.

So instead of paying $120-$180, we spent $77.68 (not including the paint) to make three curtain rods -- that price includes our Military discount. So without, it would be $85.18 (not including paint). Thank you deal of the day!

Ronnie's curtains for his room, like I said...he wants to wait to paint the dowel.

Our dining room curtains (haven't hung the bedroom curtains yet):

So next time you need curtain rods, check to see if it would be cheaper to go the DIY route! :)

Tuesday, October 22, 2013

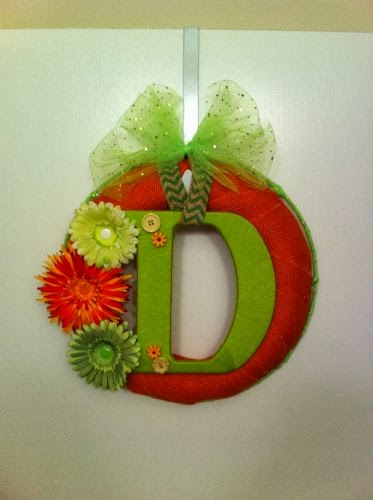
Fall Wreath Y'all

In the words of my son, "Oh My Lanta." I LOVE how this turned out and had so much fun doing it!

Materials Needed:
12" Green Box Style Metal Wreath Frame. - bought at Hobby Lobby
12" Styrofoam Extruded Wreath - bought at Hobby Lobby
Wooden Initial - We did D for our last name.
Yarn - whatever color you like, we did green.
Buttons & Flowers - optional 
I luckily went on the right day and got the orange burlap and the chevron burlap for 40% off. The tulle I already had at home, so that worked out perfectly.

Let Us Assemble:
I used some crafting wire to securely attach the styrofoam to the metal wreath.
I wrapped the green tulle around the first metal ring all the way around the metal wreath. I wrapped the orange burlap in between the first and second ring covering all of the styrofoam.
This was my finished product. And it just looked like it was missing something. SO, I went back to Hobby Lobby and picked up the initial D and some green yarn. I wrapped my D with the yarn, the corners at the top and bottom were a little tricky. It was left bare, so that's when I decided to add the buttons. It covered the spots that were missing yarn and added a little something extra. Luckily, I already had the buttons on hand. *confession: I am a hoarder of craft supplies.
I used the chevron burlap ribbon to hang my D. It was being a little tricky since it's wide ribbon, it was going to show one side chevron, one side brown. I couldn't have that, so I folded it in half and hot glued it together to keep it from coming undone. So I hung the D. Still, it seemed like it was missing something. So, I went back to my craft supplies and pulled out the flowers. I actually had made these into flower hair bows, but repurposed them for my new wreath! See, there are some perks to being a craft supply hoarder. Haha.
I just decided on the order I wanted to place my flowers and then hot glued them down. Eeek, how cute does that look?
So there you have it, my finished wreath. Such a fun craft to do and I now have the perfect fall wreath to hang every year.

Hope this gets your creative juices flowing and inspires you to create something special to hang on your door! :)


Wednesday, October 2, 2013

Outdoor Halloween Ghost Decoration

This is so so super easy and just a fun little craft to do with the family. Also, super inexpensive, which is always good! What I love about this is you can make more than just ghost. You could make pumpkins, black cats, mummy's or Frankenstein's.

We only made 4, but you can obviously make more. We picked a 4x4 from Lowe's, there machine couldn't cut it (weird, huh?), so the hubs picked up a saw while we were there too. Since we were making this a fun family craft we ended up hand painting these, obviously spray paint would be faster. And then we used black craft paint, that you can pick up at Hobby Lobby, to paint the face. And we just gave them different expressions. We did hammer a nail on the bottoms, or you could do a large screw, so we could push it into the ground and it would stay standing!

So you can do whatever measurements you want, I didn't want them all the same size. So these are the measurements we went with.
15"
20"
21"
17"

This really was a fun family craft that we enjoyed so much, hope your family enjoys it too!
If you are looking for another fun Halloween Decor craft to do check out the Outdoor Halloween Decor blog entry!