Showing posts with label crafting. Show all posts

Tuesday, October 22, 2013

Fall Wreath Y'all

In the words of my son, "Oh My Lanta." I LOVE how this turned out and had so much fun doing it!

Materials Needed:
12" Green Box Style Metal Wreath Frame. - bought at Hobby Lobby
12" Styrofoam Extruded Wreath - bought at Hobby Lobby
Wooden Initial - We did D for our last name.
Yarn - whatever color you like, we did green.
Buttons & Flowers - optional 
I luckily went on the right day and got the orange burlap and the chevron burlap for 40% off. The tulle I already had at home, so that worked out perfectly.

Let Us Assemble:
I used some crafting wire to securely attach the styrofoam to the metal wreath.
I wrapped the green tulle around the first metal ring all the way around the metal wreath. I wrapped the orange burlap in between the first and second ring covering all of the styrofoam.
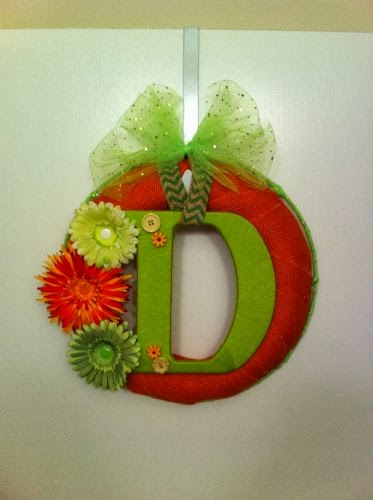
This was my finished product. And it just looked like it was missing something. SO, I went back to Hobby Lobby and picked up the initial D and some green yarn. I wrapped my D with the yarn, the corners at the top and bottom were a little tricky. It was left bare, so that's when I decided to add the buttons. It covered the spots that were missing yarn and added a little something extra. Luckily, I already had the buttons on hand. *confession: I am a hoarder of craft supplies.
I used the chevron burlap ribbon to hang my D. It was being a little tricky since it's wide ribbon, it was going to show one side chevron, one side brown. I couldn't have that, so I folded it in half and hot glued it together to keep it from coming undone. So I hung the D. Still, it seemed like it was missing something. So, I went back to my craft supplies and pulled out the flowers. I actually had made these into flower hair bows, but repurposed them for my new wreath! See, there are some perks to being a craft supply hoarder. Haha.
I just decided on the order I wanted to place my flowers and then hot glued them down. Eeek, how cute does that look?
So there you have it, my finished wreath. Such a fun craft to do and I now have the perfect fall wreath to hang every year.

Hope this gets your creative juices flowing and inspires you to create something special to hang on your door! :)


Sunday, October 13, 2013

Sun-Catcher Fun

So I was browsing through Pinterest like I so often do and came across this Bead-dazzle me a Sun-Catcher at Clever Catastrophe. What a fun project to do with the kiddo.
So given it's the month of October, we made a Pumpkin themed sun-catcher and then the kiddo chose all the different beads for our second one.

Materials Needed:
Cake Pan - As noted in the tutorial I came across and I highly agree with this, any scratches in your pan will show up on your sun-catcher, the hubs said it adds character!
Metal Washers - I used these to leave a hole in my sun-catcher to make hanging easier.
Plastic Beads - Any color you want!

Let's Craft:
Preheat oven to 400 degrees. Arrange beads however you would like, if using pony beads like these, I placed flat with hole side up. I'm sure it would be okay if the beads were on their sides too....but I tend to be a perfectionist so this is how I did it!
*Please note, the melting plastic will produce an odor.

Like I said, arrange beads however you would like.

I used two metal washers per sun-catcher, double stacked them. Bake for 20-30 minutes, depending on your oven. So I would just check after 20 mins and go from there. After it's done baking allow beads to cool and then just pop them out of the pan. Now, on our second sun-catcher I think I left it in the pan to cool for longer than I should have....it was difficult to get out of the pan. Popped a few beads out while trying to remove it, but like the hubs says, it adds character! I used grosgrain ribbon to hang them.


And done! How cute are those? And what I love about this craft...the possibilities are endless. I do believe we will make more for each holiday! Hope you enjoy this craft as much as the kiddo and I did! :)


Wednesday, October 2, 2013

Outdoor Halloween Decor

It's October and it's time to put out our Halloween Decor. This is something really fun and easy to make and inexpensive. My husband, son and I made this last year and it's one of my favorite decorations we have!
We went to Lowe's and got a 2x4. These are the measurements we had them cut.
Base (bottom) board: 29 1/2"
Pumpkin: 8"
Mummy: 10"
Frankenstein: 18"
Black Cat: 9"
Ghost: 8"

We already had craft paint on hand, but you can pick some up from Walmart or Hobby Lobby. Hobby Lobby will have a bigger selection. We used orange, green, black, lime green, gold and white. For our base board we picked up a can of webbing spray from Hobby Lobby, it only cost $4.99. It was a last minute idea that I thought would look cute. :)
You can obviously put them in any order you would like, this is just the order we chose. We did nail them to the board and did leave one nail sticking out further from the rest to help is stay on the ground. For the Mummy, we picked up a ACE Brand Self-Adhering Elastic Bandage. Once everything is painted, dried and put together we sprayed with clear sealer to help keep the paint safe!

This was such a fun family project and is such a cute decoration. We really really enjoyed making these, I hope your family does too! :)

If you are looking for another fun Halloween craft idea, check out  the Outdoor Halloween Ghost Decoration blog entry.

Outdoor Halloween Ghost Decoration

This is so so super easy and just a fun little craft to do with the family. Also, super inexpensive, which is always good! What I love about this is you can make more than just ghost. You could make pumpkins, black cats, mummy's or Frankenstein's.

We only made 4, but you can obviously make more. We picked a 4x4 from Lowe's, there machine couldn't cut it (weird, huh?), so the hubs picked up a saw while we were there too. Since we were making this a fun family craft we ended up hand painting these, obviously spray paint would be faster. And then we used black craft paint, that you can pick up at Hobby Lobby, to paint the face. And we just gave them different expressions. We did hammer a nail on the bottoms, or you could do a large screw, so we could push it into the ground and it would stay standing!

So you can do whatever measurements you want, I didn't want them all the same size. So these are the measurements we went with.
15"
20"
21"
17"

This really was a fun family craft that we enjoyed so much, hope your family enjoys it too!
If you are looking for another fun Halloween Decor craft to do check out the Outdoor Halloween Decor blog entry!